
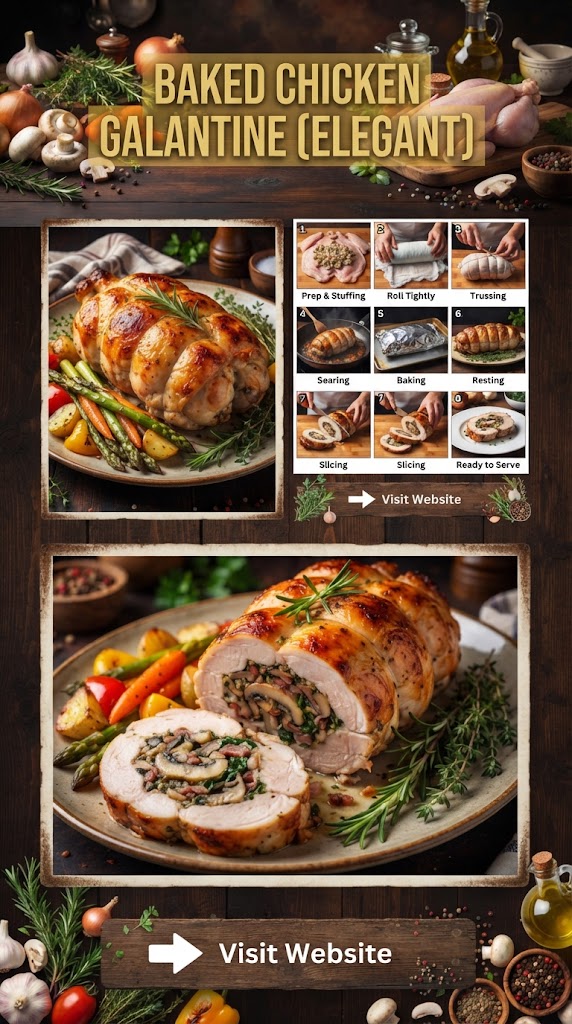
Baked Chicken Galantine (Elegant)
Baked Chicken Galantine (Elegant)
Baked Chicken Galantine is the kind of dish that instantly makes an ordinary dinner feel like a special occasion. A whole chicken is carefully deboned, filled with a flavorful mixture of seasoned chicken, herbs, vegetables, and complementary ingredients, then rolled into a neat cylinder and baked until beautifully golden on the outside and tender inside. Once sliced, the galantine reveals an attractive layered filling that looks impressive on a holiday table, dinner party, or elegant family meal.
Although the name sounds complicated, the technique becomes manageable when you divide it into simple stages: prepare the chicken, make the filling, assemble and roll, secure the galantine, bake, rest, slice, and serve.
This recipe is designed to give you a practical homemade version with clear instructions, helpful tips, ingredient substitutions, and serving ideas.
What Is Chicken Galantine?
Chicken galantine is a classic preparation in which a chicken is deboned, filled with a seasoned stuffing, rolled or shaped, cooked, cooled or rested, and sliced for serving.
The beauty of galantine is in the presentation. Instead of serving individual pieces of chicken, you slice the finished roll into rounds. Each slice contains tender chicken surrounding a flavorful filling.
Traditional versions can be elaborate and may involve forcemeat, cured meats, pistachios, vegetables, or other garnishes. This baked version is designed for the home kitchen while maintaining the elegant appearance associated with the dish.
Why You’ll Love This Recipe
There are plenty of reasons to make this baked chicken galantine.
- Elegant presentation: The sliced chicken roll looks beautiful on a serving platter.
- Tender and flavorful: The filling helps keep the chicken moist and delicious.
- Perfect for entertaining: Much of the preparation can be done ahead.
- Customizable: You can change the herbs, vegetables, cheese, or filling ingredients.
- Great for celebrations: It works wonderfully for holidays and dinner parties.
- Excellent leftovers: Thinly sliced leftovers can be served cold or reheated gently.
- Restaurant-style appearance: A few simple garnishes can make the finished dish look professional.
Complete Baked Chicken Galantine Recipe
Recipe Overview
Prep Time: 45–60 minutes
Cook Time: 60–75 minutes
Resting Time: 15–20 minutes
Total Time: About 2 hours
Servings: 8–10
Difficulty: Intermediate
Cooking Method: Oven-baked
Ingredients
For the Chicken
- 1 whole chicken, approximately 4–5 pounds
- 2 tablespoons olive oil
- 1½ teaspoons kosher salt
- 1 teaspoon freshly ground black pepper
- 1 teaspoon paprika
- ½ teaspoon garlic powder
- ½ teaspoon onion powder
- ½ teaspoon dried thyme
For the Filling
- 1 pound boneless, skinless chicken thighs
- ½ pound ground chicken
- 4 slices bacon, finely chopped
- 1 small onion, finely diced
- 2 cloves garlic, minced
- ½ cup finely diced carrots
- ½ cup finely diced celery
- ½ cup finely chopped mushrooms
- ½ cup breadcrumbs
- 1 large egg
- ¼ cup heavy cream
- ¼ cup chopped fresh parsley
- 1 tablespoon fresh thyme leaves
- 1 teaspoon salt
- ½ teaspoon black pepper
- ¼ teaspoon nutmeg
- ½ cup grated Parmesan cheese
- ¼ cup chopped pistachios, optional
For the Baking Pan
- 1 medium onion, sliced
- 1 carrot, sliced
- 1 celery stalk, sliced
- 4 garlic cloves, lightly crushed
- 2–3 sprigs fresh thyme
- 1 cup chicken stock
Optional Finishing Glaze
- 2 tablespoons melted butter
- 1 tablespoon honey
- ½ teaspoon Dijon mustard
- Pinch of black pepper
For Garnishing
- Fresh parsley
- Fresh thyme
- Lemon wedges
- Thinly sliced vegetables
- Toasted pistachios, optional
Equipment You Will Need
Having the correct equipment makes this recipe considerably easier.
- Large cutting board
- Sharp boning or chef’s knife
- Mixing bowls
- Food processor, optional
- Large skillet
- Kitchen twine
- Parchment paper
- Aluminum foil
- Roasting pan or large baking dish
- Instant-read thermometer
- Pastry brush
- Large spoon or spatula
A very sharp knife is especially important when removing the bones. A dull knife can make the process harder and increases the chance of tearing the meat.
Step 1: Prepare the Chicken
Start by removing the chicken from its packaging.
Pat the chicken thoroughly dry using paper towels. Removing excess moisture helps you work with the skin more easily and also encourages better browning during baking.
Place the chicken breast-side down on a large cutting board.
Using a sharp knife, carefully make an incision along one side of the backbone. Follow the bones closely, using small controlled cuts to separate the meat from the carcass.
Repeat on the other side.
Once the backbone has been removed, carefully continue working around the rib cage and other bones.
Important Tip
Do not rush this step.
The goal is to remove the bones while keeping the chicken skin and meat as intact as possible. Small tears can be repaired during rolling, but a large tear can make the galantine difficult to assemble.
If you are uncomfortable deboning a whole chicken, ask your butcher to debone it while keeping the skin intact.
That shortcut can save significant preparation time.
Step 2: Flatten the Chicken
Once most of the bones have been removed, open the chicken like a large sheet.
Trim away excess fat and any particularly thick sections of meat.
If one section is significantly thicker than another, you can gently butterfly it so the chicken has a more even thickness.
Cover the chicken with parchment paper or plastic wrap.
Using a meat mallet, gently pound the thickest areas until the chicken forms an approximately even layer.
Do not pound aggressively.
You want an even thickness rather than a thin, mashed surface.
Season the exposed chicken lightly with salt and pepper.
Set it aside while preparing the filling.
Step 3: Prepare the Vegetables
Heat a large skillet over medium heat.
Add the chopped bacon and cook for approximately 3–4 minutes, allowing some of the fat to render.
Add the onion, carrots, celery, and mushrooms.
Cook for approximately 6–8 minutes, stirring frequently.
The vegetables should become tender but should not be heavily browned.
Add the minced garlic and cook for another 30–60 seconds.
Remove the skillet from the heat.
Allow the vegetable mixture to cool.
Why Cooling Matters
Never mix very hot vegetables with raw ground chicken and egg.
Hot ingredients can partially cook the egg and warm the meat mixture unevenly.
Allow the vegetables to cool until they are comfortably warm or near room temperature.
Step 4: Make the Chicken Filling
Place the chicken thighs into a food processor.
Pulse several times until finely chopped.
Do not process them into a completely smooth paste unless you specifically want a very fine forcemeat texture.
For a more rustic galantine, finely chop the chicken by hand.
Place the chicken into a large bowl.
Add:
- Ground chicken
- Cooked vegetables
- Breadcrumbs
- Egg
- Heavy cream
- Parmesan
- Parsley
- Thyme
- Salt
- Black pepper
- Nutmeg
- Pistachios, if using
Mix everything thoroughly until the ingredients are evenly distributed.
Do not overmix aggressively. Mix only until the filling comes together.
Step 5: Test the Filling
This is a professional kitchen trick that is worth using at home.
Take a small spoonful of the filling.
Cook it in a small skillet until completely cooked.
Taste it.
Adjust the seasoning if necessary.
You may need additional salt, pepper, herbs, or Parmesan.
Testing the filling before rolling the chicken ensures the finished galantine is properly seasoned.
Step 6: Arrange the Chicken
Place the prepared chicken skin-side down on a large sheet of parchment paper.
The chicken should look approximately rectangular.
If some areas are thinner than others, reposition the meat slightly so the thickness is as even as possible.
Spread the filling over the chicken.
Leave approximately 1 inch of space around the edges.
Do not pile the filling too high.
A thick layer can make the galantine difficult to roll and may cause the filling to escape during baking.
Step 7: Roll the Galantine
This is one of the most important stages.
Starting from one long side, carefully roll the chicken toward the opposite side.
Use the parchment paper to help guide the roll.
Roll firmly but not excessively tight.
As you roll, gently tuck the filling inside.
The finished chicken should resemble a large, compact cylinder.
If a small amount of filling escapes from the ends, simply push it back inside.
Step 8: Tie the Chicken
Kitchen twine helps maintain the shape during baking.
Cut several pieces of twine.
Tie the galantine approximately every 1½–2 inches.
Then tie one longer piece lengthwise if needed to help hold the entire roll together.
Do not tie so tightly that the filling is squeezed out.
The twine should hold the shape securely without cutting deeply into the chicken.
Step 9: Prepare the Baking Dish
Preheat the oven to 375°F (190°C).
Place sliced onion, carrot, celery, crushed garlic, and fresh thyme in the bottom of a roasting pan.
Pour in approximately 1 cup of chicken stock.
Place the chicken galantine seam-side down on top of the vegetables.
Brush the exterior with olive oil.
Season with paprika, garlic powder, onion powder, thyme, salt, and pepper.
Step 10: Apply the Optional Glaze
For an especially attractive finish, combine:
- Melted butter
- Honey
- Dijon mustard
- Black pepper
Brush this mixture over the chicken.
The small amount of honey encourages browning and creates a beautiful glossy appearance.
Do not use too much glaze because excessive sugar can burn during baking.
Step 11: Bake the Chicken Galantine
Place the roasting pan into the preheated oven.
Bake uncovered for approximately 60–75 minutes, depending on the size and thickness of the galantine.
After approximately 40 minutes, check the surface.
If the chicken is becoming too dark, loosely cover it with aluminum foil.
Continue baking until the center reaches a safe internal temperature of 165°F (74°C).
Insert the thermometer into the thickest part of the roll, avoiding direct contact with the pan.
Do Not Rely Only on Cooking Time
Ovens vary.
Chicken size varies.
The thickness of the roll varies.
For that reason, the thermometer is the best way to determine when the chicken is finished.
Step 12: Rest the Chicken
Once the chicken reaches the appropriate internal temperature, remove it from the oven.
Transfer it carefully to a cutting board.
Allow it to rest for approximately 15–20 minutes.
This gives the juices time to redistribute and allows the filling to firm slightly.
If you slice immediately, the filling may be softer and more likely to fall apart.
Step 13: Remove the Twine
Using kitchen scissors, carefully cut and remove all the twine.
Be careful not to damage the browned skin.
Inspect the galantine.
The outside should be golden and well browned, while the inside should contain a neat, attractive filling.
Step 14: Slice the Galantine
Use a sharp carving knife.
Cut the chicken into slices approximately ¾–1 inch thick.
Wipe the knife between cuts if necessary.
This produces cleaner slices and a more elegant presentation.
Arrange the slices slightly overlapping on a large serving platter.
What the Perfect Chicken Galantine Should Look Like
A successful galantine should have several characteristics.
Outside
The skin should be:
- Golden brown
- Glossy
- Lightly crisp
- Evenly cooked
Inside
The filling should be:
- Moist
- Tender
- Fully cooked
- Well seasoned
- Firm enough to slice cleanly
Shape
The slices should hold their shape rather than collapsing.
A beautiful cross-section should reveal the chicken, creamy savory filling, herbs, vegetables, and optional pistachios.
How to Keep Chicken Galantine Moist
Chicken breast can become dry if overcooked, so moisture management is important.
Use Chicken Thighs in the Filling
Chicken thighs contain more fat than breast meat and contribute excellent flavor and moisture.
Add Heavy Cream
A small amount of cream gives the filling a softer texture.
Don’t Overbake
The most common mistake is cooking the chicken far beyond the required temperature.
Use an instant-read thermometer.
Rest Before Slicing
Resting helps retain juices.
Why the Chicken Skin Matters
The skin serves an important purpose.
It protects the filling and helps create a beautiful golden exterior.
When rolling the galantine, keep the skin intact as much as possible.
If a small tear occurs, don’t panic.
You can place the torn area toward the inside of the roll or use kitchen twine to help secure it.
Variations You Can Try
One of the best things about galantine is its versatility.
Mushroom Chicken Galantine
Increase the mushrooms and add sautéed shallots.
This creates a rich, earthy filling.
Spinach and Cheese Galantine
Add finely chopped cooked spinach and replace some Parmesan with mozzarella or Gruyère.
Make sure the spinach is squeezed very dry before adding it.
Cranberry Chicken Galantine
For a festive holiday version, add a small amount of dried cranberries to the filling.
The sweet-tart flavor pairs beautifully with chicken.
Sausage Chicken Galantine
Replace part of the ground chicken with mild chicken or pork sausage.
This creates a richer and more savory filling.
Herb Garden Galantine
Use a combination of:
- Parsley
- Thyme
- Rosemary
- Sage
- Chives
Fresh herbs create a particularly aromatic filling.
Pistachio Galantine
Increase the pistachios for a classic celebratory appearance.
The green nuts create attractive flecks throughout every slice.
Make-Ahead Instructions
Chicken galantine is an excellent make-ahead dish.
You can prepare the galantine, roll it, tie it, and refrigerate it before baking.
Keep it tightly covered and refrigerated.
For best quality, bake within about 24 hours.
You can also bake it ahead and refrigerate it after cooling.
When ready to serve, slice it cold or gently reheat it.
How to Store Leftovers
Allow the cooked galantine to cool appropriately before refrigerating.
Store leftovers in an airtight container.
Refrigerate for up to 3–4 days.
For the best texture, keep the slices together rather than cutting the entire galantine into thin slices in advance.
Can You Freeze Chicken Galantine?
Yes.
Chicken galantine can be frozen after cooking.
Allow it to cool completely.
Wrap it tightly in plastic wrap and then place it in a freezer-safe container or freezer bag.
For best quality, use within approximately 2–3 months.
Thaw overnight in the refrigerator.
Reheat gently until hot throughout.
Best Side Dishes
Because galantine is rich and elegant, lighter side dishes work especially well.
Roasted Vegetables
Roasted carrots, asparagus, Brussels sprouts, or green beans provide color and freshness.
Mashed Potatoes
Creamy mashed potatoes create a comforting pairing.
Roasted Potatoes
Crispy roasted potatoes provide a satisfying contrast to the tender chicken.
Green Salad
A fresh salad with lemon vinaigrette cuts through the richness of the filling.
Rice Pilaf
Herbed rice is another excellent option for a complete dinner.
Glazed Carrots
Sweet carrots complement the savory chicken and herbs.
Sauce Ideas
A good sauce can take chicken galantine from excellent to exceptional.
Mushroom Cream Sauce
Sauté mushrooms with butter, add chicken stock and cream, and simmer until slightly thickened.
Dijon Cream Sauce
Combine chicken stock, Dijon mustard, cream, and a little black pepper.
Herb Pan Sauce
Use the juices from the roasting pan with chicken stock and fresh herbs.
Lemon Butter Sauce
A bright lemon-butter sauce is especially good when the filling is rich.
Simple Gravy
Strain the roasting-pan juices and thicken them lightly for a classic presentation.
Troubleshooting
The Galantine Falls Apart
This usually happens because it was not rolled tightly enough or wasn’t secured adequately.
Next time, use parchment to help create a tighter cylinder and add more kitchen twine.
Filling Comes Out
The filling may have been spread too close to the edge or the roll may have been too full.
Leave about an inch of border around the chicken.
Chicken Is Dry
It was likely cooked too long.
Use an instant-read thermometer and remove the chicken once the center reaches the safe temperature.
Skin Isn’t Brown
Make sure the chicken surface is dry before seasoning.
You can also increase the oven temperature slightly during the final few minutes, watching carefully to prevent burning.
Filling Is Too Soft
Allow the galantine to rest longer before slicing.
Also ensure the vegetables weren’t excessively wet.
Slices Don’t Look Clean
Use a very sharp knife and allow the galantine to rest before slicing.
Tips for the Best Baked Chicken Galantine
1. Keep the chicken cold while preparing it
Cold chicken is easier to handle and shape.
2. Don’t overfill
More filling doesn’t necessarily mean a better galantine.
3. Season every component
The chicken, filling, vegetables, and sauce should each contribute flavor.
4. Test your filling
Cooking a tiny sample before assembling the galantine allows you to adjust seasoning.
5. Roll carefully
The parchment technique makes rolling much easier.
6. Tie evenly
Evenly spaced twine helps maintain a consistent cylindrical shape.
7. Use a thermometer
This is the most reliable way to avoid undercooking or overcooking.
8. Rest before slicing
This is essential for clean slices.
Elegant Presentation Ideas
For a dinner party, arrange the sliced galantine in a slight overlapping pattern.
Add small sprigs of fresh thyme or parsley between sections.
Serve sauce separately in a small pitcher or spoon a thin amount onto the serving plate.
For a more refined appearance, garnish with:
- Toasted pistachios
- Fresh herbs
- Lemon zest
- Roasted vegetables
- Microgreens
- Thinly sliced lemon
Keep the garnish restrained.
The colorful cross-section of the galantine should remain the centerpiece.
Frequently Asked Questions
Can I make chicken galantine without deboning the chicken myself?
Absolutely. Ask a butcher to remove the bones while leaving the skin intact. This is one of the easiest ways to simplify the recipe.
Can I use chicken breast instead of thighs?
Yes, but thighs provide more moisture and flavor. If using breast, avoid overcooking and consider adding a little extra cream or another moist ingredient to the filling.
Can I prepare the filling a day ahead?
Yes. Store the uncooked filling covered in the refrigerator and use it within a safe refrigerated period.
Can I serve galantine cold?
Yes. Traditionally inspired galantine preparations are often served chilled or at room temperature. For this baked version, it can also be served warm.
What is the best knife for slicing?
A sharp carving knife or chef’s knife works well. Clean the blade occasionally for especially neat slices.
Can I add cheese?
Yes. Parmesan, Gruyère, Swiss cheese, or mozzarella can work depending on the flavor profile you want.
Nutrition Information
Approximate nutrition will vary depending on the size of the chicken, amount of filling, bacon, cheese, and serving size.
For a typical serving, the dish provides a substantial amount of:
- Protein
- Fat
- Calcium
- Iron
- B vitamins
Because the exact nutritional profile depends heavily on ingredient brands and portion sizes, use a nutrition calculator based on your actual ingredients if precise nutritional information is required.
Complete Cooking Timeline
For easier preparation, use this timeline:
0:00–0:15
Prepare and debone chicken.
0:15–0:25
Flatten and season chicken.
0:25–0:40
Cook bacon and vegetables.
0:40–0:50
Prepare and season filling.
0:50–1:05
Spread filling and roll galantine.
1:05–1:10
Tie and season.
1:10–2:20
Bake, depending on size and oven.
2:20–2:40
Rest.
2:40–2:50
Remove twine and slice.
2:50 onward
Serve with sauce and side dishes.
Final Recipe Card
Baked Chicken Galantine
Yield: 8–10 servings
Ingredients
Chicken
- 1 whole 4–5 lb chicken
- 2 tablespoons olive oil
- 1½ teaspoons salt
- 1 teaspoon black pepper
- 1 teaspoon paprika
- ½ teaspoon garlic powder
- ½ teaspoon onion powder
- ½ teaspoon dried thyme
Filling
- 1 lb boneless chicken thighs
- ½ lb ground chicken
- 4 slices bacon
- 1 small onion
- 2 garlic cloves
- ½ cup carrots
- ½ cup celery
- ½ cup mushrooms
- ½ cup breadcrumbs
- 1 egg
- ¼ cup heavy cream
- ¼ cup parsley
- 1 tablespoon fresh thyme
- ½ cup Parmesan
- ¼ cup pistachios
- 1 teaspoon salt
- ½ teaspoon black pepper
- ¼ teaspoon nutmeg
Directions
- Preheat oven to 375°F (190°C).
- Debone the chicken while keeping the skin intact.
- Flatten the chicken into an even layer.
- Cook bacon, onion, carrot, celery, mushrooms, and garlic.
- Cool the vegetable mixture.
- Combine ground chicken, chopped chicken thighs, vegetables, breadcrumbs, egg, cream, Parmesan, herbs, and seasonings.
- Test and adjust the filling seasoning.
- Spread filling over the chicken, leaving a border around the edges.
- Roll the chicken tightly into a cylinder.
- Secure with kitchen twine.
- Place vegetables and chicken stock in a roasting pan.
- Put the galantine seam-side down in the pan.
- Brush with olive oil and season.
- Bake for approximately 60–75 minutes.
- Check the thickest portion with an instant-read thermometer.
- Remove when the center reaches 165°F (74°C).
- Rest for 15–20 minutes.
- Remove the twine.
- Slice into ¾–1-inch rounds.
- Serve with vegetables and your favorite sauce.
Final Thoughts
Baked Chicken Galantine is an impressive centerpiece that rewards careful preparation. Its elegant appearance makes it ideal for holidays, dinner parties, anniversaries, family celebrations, and any meal where you want to serve something a little different from ordinary roasted chicken.
The key is not to think of the recipe as one complicated task. Break it into stages: debone, prepare, fill, roll, tie, bake, rest, and slice.
Once you become comfortable with the rolling technique, you can customize the filling in countless ways. Mushrooms, spinach, herbs, cheese, pistachios, cranberries, and other flavorful ingredients can transform the same basic preparation into an entirely different dish.
For the best result, keep the chicken evenly shaped, avoid overfilling, season the filling carefully, secure the roll firmly, and rely on an instant-read thermometer rather than cooking time alone. Give the finished galantine enough time to rest before slicing, and you’ll be rewarded with tender chicken, a flavorful center, and beautiful slices that look worthy of a special-occasion table.
Baked Chicken Galantine is elegant enough for entertaining but practical enough to make at home—and once sliced and arranged on a platter, it delivers the kind of presentation that makes every dinner feel like a celebration.