Baked Chicken Kiev (Butter Stuffed)
Baked Chicken Kiev (Butter Stuffed)
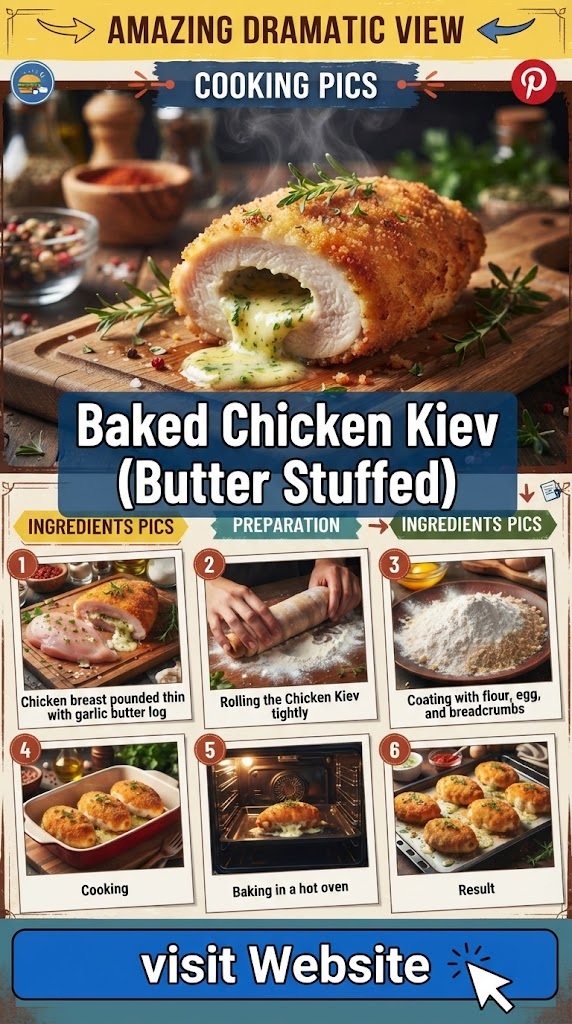
Baked Chicken Kiev is a classic comfort-food dish featuring tender chicken breasts wrapped around seasoned garlic butter, coated in crisp breadcrumbs, and baked until golden brown. When sliced, the chicken releases a delicious pool of melted herb butter, making every bite juicy, savory, and incredibly flavorful.
This oven-baked version gives you the traditional Chicken Kiev experience without deep-frying. The key is preparing the chicken carefully, sealing the butter completely, chilling the stuffed breasts before coating, and baking them at the right temperature. The result is beautifully golden chicken with a crisp exterior and a rich, buttery center.
What Is Chicken Kiev?
Chicken Kiev is traditionally made by pounding chicken breast thin, placing seasoned butter in the center, and carefully wrapping the chicken around the butter. The chicken is then coated in breadcrumbs and cooked until golden and fully done.
The famous feature of Chicken Kiev is the butter-filled center. Garlic, parsley, salt, and pepper are mixed into softened butter, which is then chilled until firm. As the chicken cooks, the butter melts inside the sealed chicken breast.
Unlike ordinary stuffed chicken, Kiev requires special attention to sealing. If the chicken has gaps or tears, the butter can escape during baking. A properly prepared Kiev should keep most of the seasoned butter inside until the chicken is served.
Why You’ll Love This Baked Chicken Kiev
There are plenty of reasons to make this recipe at home.
- Juicy chicken breast
- Rich garlic-herb butter center
- Crispy golden breadcrumb coating
- Baked rather than deep-fried
- Elegant enough for entertaining
- Comforting enough for a family dinner
- Easy ingredients
- Make-ahead friendly
- Wonderful with vegetables, potatoes, or salad
- Beautiful when sliced open and served
The combination of crispy breadcrumbs, tender chicken, garlic, parsley, and melted butter creates a restaurant-style meal without requiring complicated ingredients.
Complete Ingredients
For the Chicken
- 4 large boneless, skinless chicken breasts
- 1 teaspoon salt
- ½ teaspoon freshly ground black pepper
- ½ teaspoon paprika
- ½ teaspoon garlic powder
- ½ teaspoon onion powder
For the Garlic-Herb Butter
- ½ cup unsalted butter, softened
- 4 cloves garlic, finely minced
- 2 tablespoons fresh parsley, finely chopped
- 1 tablespoon fresh chives, finely chopped
- ½ teaspoon salt
- ¼ teaspoon black pepper
- ½ teaspoon lemon zest
- 1 teaspoon fresh lemon juice
For the Breadcrumb Coating
- 1 cup plain breadcrumbs
- 1 cup panko breadcrumbs
- ½ cup all-purpose flour
- 2 large eggs
- 2 tablespoons milk
- ½ teaspoon salt
- ¼ teaspoon black pepper
- ½ teaspoon paprika
- ¼ teaspoon garlic powder
For Baking
- 2 tablespoons olive oil or melted butter
- Cooking spray, if needed
Equipment Needed
You do not need professional kitchen equipment for this recipe.
You will need:
- Large mixing bowl
- Small mixing bowl
- Cutting board
- Sharp kitchen knife
- Meat mallet
- Plastic wrap
- Three shallow bowls
- Baking sheet
- Parchment paper or a wire rack
- Pastry brush
- Kitchen tongs
- Instant-read meat thermometer
A meat thermometer is especially useful because stuffed chicken can be more difficult to judge by appearance alone.
How to Make the Garlic Butter Filling
The garlic butter is the heart of Chicken Kiev, so it deserves special attention.
Start by placing the softened butter in a small bowl.
Add the minced garlic, chopped parsley, chives, salt, black pepper, lemon zest, and lemon juice.
Mix everything thoroughly until the herbs and garlic are evenly distributed throughout the butter.
Taste a small amount and adjust the seasoning if necessary.
The butter should taste slightly stronger than you might expect. Once it is enclosed inside the chicken, its flavor becomes more mellow.
Shape the Butter
Place a sheet of plastic wrap on your work surface.
Transfer the garlic-herb butter onto the plastic wrap.
Shape it into a log approximately 1½ inches thick.
Wrap the butter tightly and twist the ends of the plastic wrap.
Place it in the refrigerator for at least 30 minutes.
For even firmer butter, refrigerate it for about 1 hour.
You can also freeze the butter log for approximately 15–20 minutes to make it easier to cut.
Preparing the Chicken Breasts
Chicken breasts are usually too thick to wrap around butter properly unless they are flattened.
Place one chicken breast on a cutting board.
Cover it with plastic wrap.
Using the flat side of a meat mallet, gently pound the chicken until it is approximately ¼ inch thick.
Do not pound aggressively. You want the chicken thin enough to roll but not so thin that it develops holes.
Repeat with the remaining chicken breasts.
Important Tip
Pay particular attention to the edges.
The edges need to remain strong enough to seal around the butter. If you create very thin or torn edges, melted butter may escape while baking.
Seasoning the Chicken
Season both sides of the flattened chicken with:
- Salt
- Black pepper
- Paprika
- Garlic powder
- Onion powder
Do not over-season because the garlic butter and breadcrumb coating will also contain seasoning.
Allow the seasoned chicken to rest for about 5–10 minutes while you prepare the butter.
Adding the Butter
Remove the chilled butter from the refrigerator.
Cut it into four equal portions.
Place one portion near the center of each flattened chicken breast.
The butter should not extend too close to the edges.
Leaving space around the butter makes sealing much easier.
How to Roll Chicken Kiev Correctly
This is the most important part of the recipe.
Fold the shorter sides of the chicken inward first.
Then fold one long side over the butter.
Continue rolling the chicken tightly toward the opposite side.
The butter should be completely enclosed.
Press the seam gently with your fingers.
If necessary, tuck any loose chicken underneath the roll.
You want a compact parcel with no visible openings.
Repeat with the remaining chicken breasts.
Chilling the Stuffed Chicken
Place the stuffed chicken breasts seam-side down on a plate or tray.
Cover loosely with plastic wrap.
Refrigerate for approximately 20–30 minutes.
This step is extremely helpful.
Cold chicken holds its shape better during breading and baking, while the chilled butter takes longer to melt.
If the butter is already becoming soft, chill the chicken for closer to 45 minutes.
Preparing the Breadcrumb Station
Set up three shallow bowls.
Bowl 1: Flour
Combine:
- ½ cup flour
- ¼ teaspoon salt
- ¼ teaspoon black pepper
Bowl 2: Egg Wash
Whisk together:
- 2 eggs
- 2 tablespoons milk
Whisk until smooth.
Bowl 3: Breadcrumbs
Combine:
- 1 cup plain breadcrumbs
- 1 cup panko breadcrumbs
- ½ teaspoon salt
- ¼ teaspoon black pepper
- ½ teaspoon paprika
- ¼ teaspoon garlic powder
The combination of regular breadcrumbs and panko creates a coating that is both crisp and well-structured.
Breading the Chicken Kiev
Remove the chilled chicken from the refrigerator.
Take one chicken parcel and coat it lightly in the flour mixture.
Shake off excess flour.
Dip it into the egg mixture.
Make sure the egg reaches all sides.
Allow excess egg to drip back into the bowl.
Finally, place the chicken into the breadcrumb mixture.
Press the breadcrumbs gently onto the chicken.
Do not squeeze the chicken too hard because you do not want to disturb the butter inside.
Repeat with all four chicken breasts.
Double Breading for Extra Protection
For particularly juicy Chicken Kiev, consider double-breading.
After the first breadcrumb coating, dip the chicken gently back into the egg mixture.
Then coat it again with breadcrumbs.
A second coating creates a thicker protective shell around the chicken.
It also helps prevent melted butter from escaping.
This is especially useful if your chicken breasts are large or have thinner areas.
Preparing the Oven
Preheat your oven to:
400°F (200°C)
Allow the oven to fully preheat before placing the chicken inside.
A properly heated oven helps the breadcrumb coating begin crisping immediately.
Line a baking sheet with parchment paper.
For even better air circulation, place a wire rack over the baking sheet and arrange the chicken on top.
Lightly brush or spray the breadcrumb coating with olive oil or melted butter.
This encourages beautiful browning.
Baking the Chicken Kiev
Place the breaded chicken on the prepared baking sheet.
Make sure there is space between each piece.
Do not overcrowd the pan.
Place the baking sheet in the preheated oven.
Bake for approximately 25–35 minutes, depending on the size and thickness of your chicken breasts.
The chicken is ready when the thickest part reaches an internal temperature of 165°F (74°C).
Because the chicken contains a butter filling, check the temperature from the side or thickest section while avoiding pushing the thermometer too deeply into the butter center.
How to Know When Chicken Kiev Is Done
Color alone is not enough to determine whether stuffed chicken is safely cooked.
The most reliable method is an instant-read thermometer.
Insert the thermometer into the thickest portion of the chicken.
The chicken should reach:
165°F (74°C)
The breadcrumbs should be golden brown and crisp.
The chicken should feel firm but not hard when gently pressed.
If the coating is browning too quickly while the chicken still needs more cooking, loosely cover the top with foil and continue baking.
Resting the Chicken
Once the chicken reaches the correct internal temperature, remove it from the oven.
Let it rest for approximately 5–10 minutes.
Do not immediately cut into the chicken.
Resting allows the juices to redistribute and gives the butter inside a moment to settle.
Cutting immediately can cause the hot butter to rush out onto the plate.
How to Serve Chicken Kiev
Chicken Kiev is especially dramatic when served whole and sliced at the table.
Place one Kiev on each plate.
Slice it carefully with a sharp knife.
As the chicken opens, the garlic-herb butter should begin flowing onto the plate.
Serve immediately.
The melted butter can also act as a sauce for potatoes or vegetables.
Best Side Dishes for Chicken Kiev
Chicken Kiev is rich and buttery, so it pairs particularly well with fresh vegetables and simple starches.
Mashed Potatoes
Creamy mashed potatoes are one of the best companions.
The garlic butter from the chicken can mingle with the potatoes, creating an incredibly flavorful bite.
Roasted Potatoes
Crispy roasted potatoes provide a wonderful contrast to the tender chicken.
Season them simply with olive oil, salt, pepper, and herbs.
Green Beans
Steamed or roasted green beans add freshness and color.
A small squeeze of lemon is especially good.
Roasted Carrots
Sweet roasted carrots balance the savory garlic butter.
Garden Salad
A crisp salad with lettuce, cucumber, tomatoes, and a light vinaigrette can cut through the richness of the chicken.
Steamed Broccoli
Broccoli is another excellent option.
Its slightly bitter flavor works beautifully with rich butter.
Rice
Plain steamed rice is an easy choice for absorbing the flavorful butter.
Tips for Perfect Baked Chicken Kiev
1. Keep the Butter Cold
Cold butter is much easier to handle.
If it becomes soft while preparing the chicken, return it to the refrigerator.
2. Do Not Overfill
It may be tempting to add a large amount of butter.
However, too much butter makes sealing difficult and increases the chance of leakage.
3. Seal the Chicken Carefully
Look closely at every seam.
Even a small opening can allow butter to escape.
4. Chill Before Breading
This helps the chicken maintain its shape.
It also keeps the butter firm.
5. Use Panko Breadcrumbs
Panko creates a particularly crisp coating.
Combining panko with traditional breadcrumbs gives you excellent texture.
6. Do Not Skip the Egg Wash
The egg acts as a binding layer between the flour and breadcrumbs.
7. Lightly Oil the Coating
A small amount of oil helps the breadcrumbs become golden and crunchy in the oven.
8. Use a Thermometer
Stuffed chicken is much easier to cook correctly when you use an instant-read thermometer.
Common Mistakes to Avoid
Butter Leaking Everywhere
The most common problem with Chicken Kiev is butter escaping during cooking.
This usually happens because the chicken was not sealed properly, the butter was too soft, or the chicken was too thin.
Chicken Is Dry
Overcooking is the primary cause.
Use a thermometer and remove the chicken once the thickest portion reaches 165°F (74°C).
Breadcrumbs Are Pale
Brush or spray the coating lightly with oil before baking.
You can also place the chicken under the broiler for the final 1–2 minutes, watching it carefully.
Coating Falls Off
Make sure the chicken is dry before beginning.
Follow the flour → egg → breadcrumbs sequence.
Press the breadcrumbs gently onto the surface.
Chicken Unrolls
The chicken should be rolled tightly and placed seam-side down.
Chilling before baking also helps maintain its shape.
Can Chicken Kiev Be Prepared Ahead?
Yes.
You can prepare the butter several days in advance and keep it refrigerated.
You can also assemble and bread the chicken several hours before dinner.
Keep the prepared Chicken Kiev refrigerated until you are ready to bake it.
For food safety, avoid leaving raw chicken at room temperature for extended periods.
Can Chicken Kiev Be Frozen?
Yes, Chicken Kiev can be frozen before baking.
Prepare and bread the chicken as directed.
Place the pieces on a parchment-lined tray without touching.
Freeze until firm.
Then transfer them to an airtight freezer-safe container or bag.
Label the container with the date.
When ready to cook, bake from frozen or allow the chicken to thaw safely in the refrigerator first. If baking from frozen, expect the cooking time to be longer and always verify that the center reaches 165°F (74°C).
Variations of Chicken Kiev
Parmesan Chicken Kiev
Add finely grated Parmesan cheese to the breadcrumb mixture.
The cheese becomes golden and savory during baking.
Lemon Herb Kiev
Increase the lemon zest and add extra parsley to the butter.
This version tastes particularly fresh.
Spicy Chicken Kiev
Add a pinch of cayenne pepper or red pepper flakes to the garlic butter.
Cheese-Stuffed Kiev
Add a small amount of mozzarella or another melting cheese to the center with the butter.
Do not overfill.
Herb Butter Kiev
Experiment with herbs such as:
- Parsley
- Chives
- Dill
- Tarragon
- Basil
Mushroom Kiev
Finely chopped sautéed mushrooms can be mixed into the butter.
Make sure the mushrooms are cooled before incorporating them.
Making the Recipe More Crispy
For the crispiest oven-baked Chicken Kiev, use panko breadcrumbs.
You can also toast the panko lightly in a dry skillet before breading.
Heat a skillet over medium heat.
Add the panko without oil.
Stir frequently until lightly golden.
Immediately transfer it to a plate and allow it to cool.
Then combine it with your regular breadcrumbs and seasonings.
This gives the finished chicken a deeper golden color.
How to Make Chicken Kiev Extra Juicy
The filling already contributes plenty of moisture, but several techniques help keep the chicken tender.
First, avoid pounding the chicken too aggressively.
Second, do not overcook it.
Third, allow it to rest after baking.
Finally, choose chicken breasts that are reasonably thick and uniform in size.
If one end is much thinner than the other, fold the thinner portion inward during rolling.
Storage Instructions
Allow leftover Chicken Kiev to cool appropriately before refrigerating.
Place leftovers in an airtight container.
Refrigerate and use within 3–4 days.
For the best texture, reheat in an oven or air fryer rather than a microwave.
The oven helps restore some of the crispness of the breadcrumb coating.
When reheating chicken, make sure it reaches a safe internal temperature.
Reheating Chicken Kiev
Preheat the oven to 350°F (175°C).
Place the chicken on a baking sheet.
Heat for approximately 15–20 minutes, depending on size.
Check the center to ensure it is thoroughly heated.
Avoid excessively high temperatures during reheating because the butter can escape rapidly and the breadcrumb coating may burn before the chicken is hot.
Frequently Asked Questions
Can I use salted butter?
Yes. If you use salted butter, reduce the additional salt in the garlic butter.
Can I use dried parsley?
Fresh parsley gives the best flavor, but dried parsley can be used when necessary. Use less because dried herbs are more concentrated.
Can I make Chicken Kiev without garlic?
Absolutely. Replace the garlic with additional fresh herbs, lemon zest, or a small amount of finely chopped shallot.
Why is my butter leaking?
The chicken may not have been sealed tightly enough, the butter may have been too soft, or the chicken may have been overfilled.
Can I fry Chicken Kiev instead?
Traditional Chicken Kiev is often fried, but baking provides a convenient alternative with less oil.
Can I use chicken thighs?
Yes, although boneless chicken thighs have a different shape and texture. Chicken breasts are easier to flatten and roll for the classic Kiev shape.
How much butter should go inside?
Approximately 2 tablespoons of seasoned butter per chicken breast is a good starting point.
Can I make the butter in advance?
Yes. The garlic-herb butter can be prepared ahead and refrigerated until needed.
Nutrition Notes
The nutritional value of Chicken Kiev depends on the size of the chicken breasts, amount of butter used, breadcrumb quantity, and serving size.
Because this recipe contains butter, breadcrumbs, and chicken breast, it is a rich main course.
For a lighter version, you can reduce the butter slightly, use less breadcrumb coating, and serve the chicken with plenty of steamed or roasted vegetables.
Complete Recipe at a Glance
Recipe: Baked Chicken Kiev
Style: Butter Stuffed
Prep Time: 30 minutes
Chilling Time: 30 minutes
Cook Time: 25–35 minutes
Total Time: Approximately 1 hour 30 minutes
Servings: 4
Ingredients
Chicken
- 4 boneless, skinless chicken breasts
- 1 teaspoon salt
- ½ teaspoon black pepper
- ½ teaspoon paprika
- ½ teaspoon garlic powder
- ½ teaspoon onion powder
Garlic Butter
- ½ cup unsalted butter
- 4 cloves garlic
- 2 tablespoons parsley
- 1 tablespoon chives
- ½ teaspoon salt
- ¼ teaspoon black pepper
- ½ teaspoon lemon zest
- 1 teaspoon lemon juice
Coating
- ½ cup flour
- 2 eggs
- 2 tablespoons milk
- 1 cup plain breadcrumbs
- 1 cup panko
- ½ teaspoon salt
- ¼ teaspoon pepper
- ½ teaspoon paprika
- ¼ teaspoon garlic powder
For Baking
- 2 tablespoons olive oil or melted butter
Method
- Mix softened butter with garlic, parsley, chives, lemon zest, lemon juice, salt, and pepper.
- Shape the butter into a log and chill until firm.
- Flatten the chicken breasts to approximately ¼ inch thick.
- Season both sides.
- Place chilled butter in the center of each breast.
- Fold and roll the chicken tightly around the butter.
- Seal all edges carefully.
- Chill the stuffed chicken for 20–30 minutes.
- Coat each piece in seasoned flour.
- Dip into beaten egg and milk.
- Coat thoroughly with seasoned breadcrumbs.
- For extra crispness, double-bread if desired.
- Place on a lined baking sheet or wire rack.
- Lightly brush with oil or melted butter.
- Bake at 400°F (200°C) for approximately 25–35 minutes.
- Check that the chicken reaches 165°F (74°C) internally.
- Rest for 5–10 minutes.
- Serve hot and slice carefully to reveal the melted garlic butter.
Final Thoughts
Baked Chicken Kiev is one of those dishes that looks impressive but becomes surprisingly manageable once you understand the technique. The secret is not complicated ingredients; it is cold butter, properly flattened chicken, careful rolling, thorough sealing, and controlled baking.
The seasoned garlic butter creates the signature Kiev experience. When the golden breadcrumb coating is cut open, the warm butter flows into the tender chicken, creating a rich sauce naturally.
For a complete dinner, pair the chicken with mashed potatoes, roasted vegetables, green beans, or a crisp garden salad. The buttery juices from the Chicken Kiev can be spooned over the potatoes or vegetables, making sure none of that delicious flavor goes to waste.
If you want the best possible result, prepare the garlic butter ahead of time, keep it cold, chill the assembled chicken before baking, and use an instant-read thermometer to avoid overcooking. With these simple techniques, you can make crispy, golden, juicy Baked Chicken Kiev with a flavorful butter-stuffed center right in your own kitchen.